If you are choosing between PrivateWhisper and Otter.ai, you are not comparing two similar products. They solve the same problem (speech → text), but in very different ways.
What Otter.ai Is Good At
Otter.ai is a cloud-based transcription service, mainly built for:
Live meeting transcription
Teams and collaboration
Zoom / Google Meet style workflows
Shared notes, comments, highlights
Strengths:
Works automatically during meetings
No local install needed
Good for teams and recurring calls
Syncs across devices
If you live in meetings and want transcripts without thinking about files, Otter.ai makes sense.
Where Otter.ai Is Not Ideal
Otter.ai is not designed as a simple macOS transcription tool.
Limitations:
Requires an account
Requires internet
Subscription-based (monthly / yearly)
Audio is always uploaded to the cloud
Overkill if you just want to transcribe files
You keep paying even if you barely use it
For solo users or occasional transcription, it can feel heavy and expensive.
What PrivateWhisper Is (and Isn’t)
PrivateWhisper is a macOS-focused transcription app, not a collaboration platform.
Running Whisper Large on a Mac is no longer a niche experiment. In 2025, local transcription is practical, fast enough on modern hardware, and often preferable to cloud-based solutions.
This guide focuses on what actually works when running Whisper Large locally on macOS, what to avoid, and how to choose a setup that makes sense for real workloads.
Why people run Whisper Large locally (not in the cloud)
Most users who switch to local Whisper Large do it for one of three reasons:
Privacy – audio never leaves the device
Control – no rate limits, no API pricing
Reliability – works offline, no dependency on services
For interviews, meetings, research data, or internal recordings, these advantages outweigh the convenience of cloud tools.
Is Whisper Large practical on a Mac?
Short answer: yes — but hardware matters.
Apple Silicon Macs
On M1, M2, and M3 Macs, Whisper Large is:
usable for long recordings
accurate enough for professional work
limited mainly by patience, not feasibility
Intel Macs
Possible, but:
significantly slower
not ideal for batch jobs
better suited for short audio only
If you plan to use Whisper Large regularly, Apple Silicon is strongly recommended.
What “Whisper Large” actually means in practice
Whisper Large is not just “a bit better” than smaller models.
It improves:
sentence structure and punctuation
handling of accents and unclear speech
consistency over long recordings
reduced hallucinations
The trade-off is compute cost: more CPU usage, more memory, more time.
For many users, this is acceptable — but only if used deliberately.
Choosing the right way to run Whisper Large on macOS
There are two common approaches.
1. Command-line / developer setup
Best for:
developers
automation
scripting workflows
Downsides:
setup friction
manual model management
less convenient exports
2. Native macOS apps with local models
Best for:
non-developers
repeat workflows
long recordings
batch transcription
Upsides:
model management handled for you
simple UI
easy export formats
For most people in 2025, a native macOS app is the more sustainable option.
Typical local workflow that makes sense
A realistic and efficient workflow looks like this:
Use a medium or small model for quick drafts
Identify recordings where accuracy matters
Re-run only those with Whisper Large
Export final text or subtitles
This avoids wasting time and battery on Large when it isn’t needed.
Performance expectations (realistic)
On Apple Silicon Macs:
Whisper Large usually runs slower than real-time
long recordings can take significant time
CPU usage is high during transcription
This is normal. Plugging in your Mac for longer jobs is recommended.
If you expect instant results, cloud tools will feel faster — but you give up control and privacy.
Common mistakes people make
Using Whisper Large for everything, including short voice notes
Running batch jobs on battery power
Expecting Intel Macs to perform like Apple Silicon
Ignoring audio quality (which matters more than model size)
Avoiding these mistakes dramatically improves the experience.
Who Whisper Large on Mac is actually for
Whisper Large makes sense if you:
transcribe long or important recordings
need high accuracy without cloud uploads
work with sensitive material
value predictable costs over subscriptions
If you only need quick notes or casual transcription, smaller models are usually enough.
Running Whisper Large with a macOS app
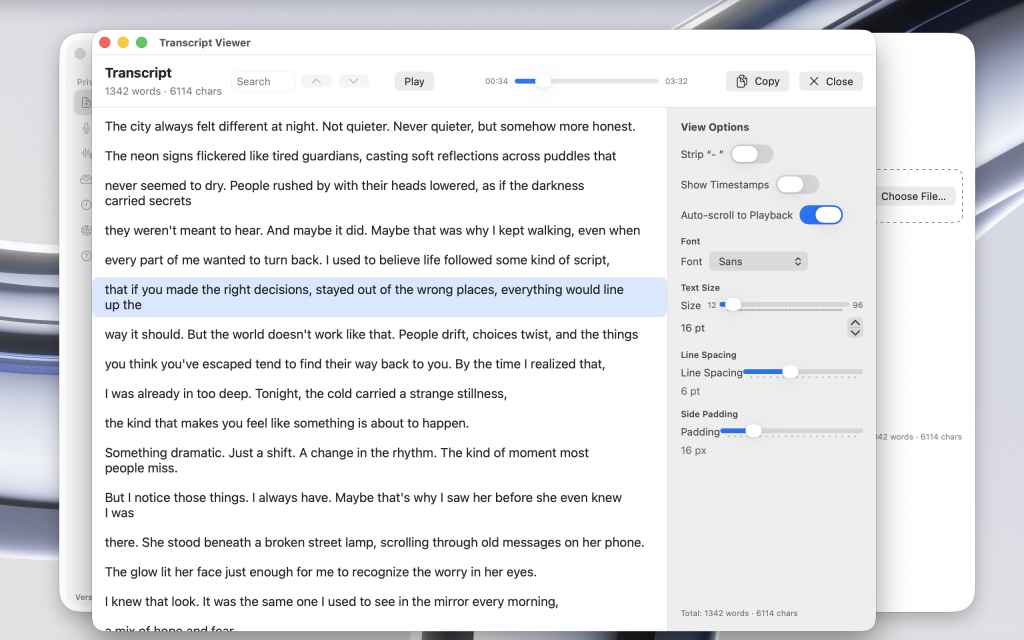
If you want to run Whisper Large locally without managing models or command-line tools, PrivateWhisper supports this workflow on macOS.
It allows you to:
run Whisper Large fully offline
switch between model sizes
handle long recordings
export transcripts and subtitles easily
You can try it for free and decide if it fits your needs.
Speech-to-text on macOS generally falls into two categories: local (offline) transcription and cloud-based transcription. Both approaches convert audio into text, but they differ significantly in privacy, reliability, cost, and workflow.
This article explains the real differences between local and cloud transcription, and when each approach makes sense.
What is local (offline) speech-to-text?
Local speech-to-text means:
transcription runs entirely on your Mac
audio files are processed on-device
no internet connection is required
no audio is uploaded to external servers
Once the transcription app and models are installed, everything works offline — even in airplane mode.
What is cloud transcription?
Cloud transcription works by:
uploading audio files to remote servers
processing speech on third-party infrastructure
returning the text result to your device
Most cloud services require:
a stable internet connection
an account or API key
acceptance of data retention and processing policies
Privacy and data control
This is the biggest difference.
Local transcription
audio never leaves your Mac
no third-party data processors
no retention policies to worry about
suitable for confidential or regulated data
Cloud transcription
audio is uploaded to external servers
data may be stored temporarily or permanently
subject to provider privacy policies
often unsuitable for sensitive material
If privacy or compliance matters, local transcription is the safer option.
Internet dependency and reliability
Local transcription
works without internet
unaffected by outages or API downtime
reliable when traveling or offline
Cloud transcription
fails without internet access
depends on server availability
affected by network speed and latency
Offline reliability is often underestimated until it becomes a problem.
Cost and pricing models
Local transcription
typically a one-time purchase or optional upgrade
no per-minute or per-file fees
predictable long-term cost
Cloud transcription
usually billed per minute or via subscription
costs scale with usage
pricing changes are outside your control
For occasional use, cloud pricing may seem cheap. For regular transcription, local tools often become more cost-effective over time.
Performance and speed
Local transcription
speed depends on your Mac’s hardware
Apple Silicon Macs perform particularly well
no upload or download delays
Cloud transcription
server-side processing can be fast
overall speed depends on upload time
large files may take longer to send than to transcribe
For large files or batch jobs, local transcription can be faster overall.
Accuracy considerations
Both local and cloud transcription can achieve high accuracy.
Accuracy depends more on:
audio quality
microphone setup
model choice
language and accents
Modern local models are comparable to cloud solutions for most use cases. The gap is far smaller than it used to be.
Typical use cases
Local speech-to-text is better for:
interviews
meetings
legal or medical recordings
research data
offline or travel scenarios
privacy-sensitive workflows
Cloud transcription is better for:
quick, casual transcription
users who don’t want to install anything
scenarios where privacy is not a concern
Choosing the right approach on macOS
The choice comes down to priorities:
If privacy, control, and reliability matter → local transcription
If convenience and zero setup matter more → cloud transcription
Many users start with cloud tools and later move to local solutions as their needs become more serious.
Local speech-to-text on macOS
If you want to run speech-to-text locally on macOS, you need:
a Mac capable of local processing
an offline transcription app
local speech-to-text models
Apps like PrivateWhisper provide this setup, allowing transcription to run fully on-device with support for long recordings, batch processing, and multiple export formats.
You can try it for free and decide later if it fits your workflow.
Whisper Large v3 is one of the most accurate speech-to-text models available today. Many macOS users want to run it locally, without relying on cloud APIs or uploading audio files.
But Large v3 comes with trade-offs.
This article explains how Whisper Large v3 performs on Mac, when it makes sense to use it offline, and how to balance accuracy vs speed in real-world workflows.
What is Whisper Large v3?
Whisper Large v3 is the highest-accuracy version of OpenAI’s Whisper speech-to-text models. Compared to smaller variants, it offers:
better handling of accents
improved punctuation and sentence structure
fewer hallucinations on long recordings
stronger performance on noisy audio
The cost of this accuracy is compute.
Large v3 is significantly heavier than small or medium models.
Can Whisper Large v3 run locally on macOS?
Yes. Whisper Large v3 can run fully offline on macOS.
However, performance depends heavily on your hardware.
Hardware considerations
Apple Silicon (M1 / M2 / M3): Recommended. Large v3 is usable, especially for long-form transcription.
Intel Macs: Technically possible, but slow. Large v3 may be impractical for anything beyond short clips.
No internet connection is required once the model is installed.
Accuracy vs speed: the real trade-off
Whisper Large v3 is not always the right choice. Here’s how it compares to smaller models in practice.
Accuracy
Large v3 excels at:
long recordings (30+ minutes)
multiple speakers
unclear pronunciation
background noise
non-native accents
If transcription quality matters more than time, Large v3 is hard to beat.
Speed
The downside:
slower processing
higher CPU and memory usage
increased battery drain on laptops
On Apple Silicon Macs, Large v3 typically runs below real-time speed, depending on audio quality and system load.
When Whisper Large v3 makes sense on Mac
Use Whisper Large v3 if:
accuracy is critical
audio quality is mixed or poor
recordings are long and valuable
you plan to review text, not just skim it
Typical use cases:
interviews
legal or research recordings
archived meetings
documentary or media work
When a smaller model is the better choice
Large v3 is often unnecessary for:
quick voice notes
clear dictation
draft transcripts
short clips
Smaller models:
run much faster
consume fewer resources
are often “good enough”
A common workflow is:
use a smaller model for drafts
re-run critical files with Large v3 only when needed
Offline transcription workflow on Mac
A practical offline workflow looks like this:
Choose a smaller model for speed
Transcribe all files offline
Identify recordings that need higher accuracy
Re-transcribe those with Whisper Large v3
Export final results
This approach saves time without sacrificing quality where it matters.
Battery and thermal considerations
Running Whisper Large v3 locally is compute-intensive.
Expect:
noticeable CPU usage
fan activity on MacBooks with cooling
faster battery drain during long sessions
For long batch jobs, plugging in your Mac is strongly recommended.
Using Whisper Large v3 offline on macOS
To run Whisper Large v3 locally, you need:
the model file installed on your Mac
an app that supports local Whisper models
enough disk space and memory
Some macOS apps handle model management and transcription setup for you, making offline use straightforward.
One such option is PrivateWhisper, which supports running Whisper Large v3 fully offline, alongside smaller models for faster workflows.
You can choose the model based on your accuracy and speed needs.
If you only transcribe one audio file at a time, almost any transcription tool will do. But once you start working with multiple recordings — interviews, meetings, lectures, or media files — manual, one-by-one transcription becomes a bottleneck.
Batch audio transcription on macOS solves this by letting you process many files in one pass, without babysitting the workflow.
This article explains how batch transcription works on Mac, when it makes sense, and how to do it offline.
What is batch audio transcription?
Batch transcription means:
selecting multiple audio files or folders
running transcription on all of them automatically
exporting results in one go
Instead of repeating the same steps for each file, you let your Mac handle everything in the background.
This matters when you deal with:
interviews recorded over multiple days
meeting archives
podcasts or video audio tracks
research datasets
customer call recordings
Why batch transcription matters on macOS
Without batch processing, transcription becomes slow and error-prone:
You manually open each file
You wait for transcription to finish
You export results one by one
You repeat the process dozens of times
Batch transcription:
saves hours of repetitive work
reduces mistakes
keeps file naming and exports consistent
lets you focus on reviewing content, not managing files
For anyone working with more than a few recordings, this is not optional — it’s basic workflow hygiene.
Offline vs cloud batch transcription
Many cloud services technically support batch uploads, but come with trade-offs:
Cloud-based batch transcription
requires uploading all files
depends on internet speed and stability
raises privacy concerns
often has usage limits or per-minute costs
Offline batch transcription on Mac
runs entirely on-device
works without internet access
keeps all audio local
has no per-file or per-minute fees
If privacy, cost control, or reliability matters, offline batch transcription is the safer option.
What you need for offline batch transcription on macOS
To transcribe multiple files locally, you need:
A Mac with sufficient performance Apple Silicon Macs handle batch workloads particularly well.
Local speech-to-text models These run directly on your machine and do not require cloud APIs.
An app that supports batch workflows This is the critical part. Many apps can transcribe one file but fall apart when scaling to dozens.
Once set up, batch transcription works entirely offline.
Typical batch transcription workflow
A practical offline batch workflow looks like this:
Place all audio files in a folder
Select the folder or multiple files in the app
Choose a transcription model (speed vs accuracy)
Start batch processing
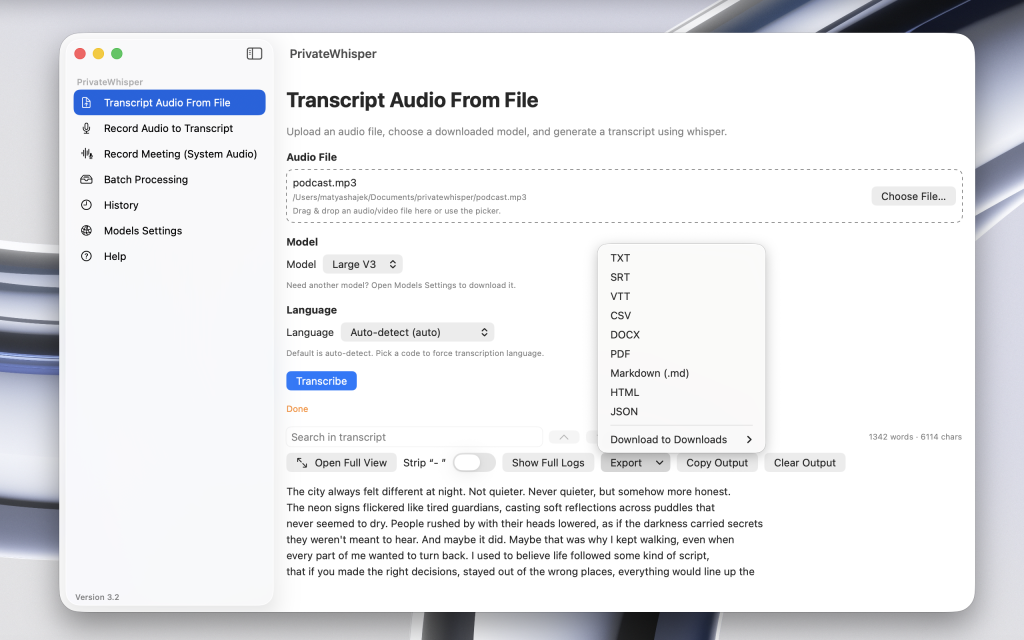
Export results automatically (TXT, SRT, etc.)
No uploads. No accounts. No waiting on servers.
Common batch transcription use cases
Batch transcription on macOS is especially useful for:
journalists transcribing multiple interviews
researchers processing recorded studies
content creators generating subtitles
teams archiving meeting recordings
students transcribing lectures in bulk
In all of these cases, manual transcription simply doesn’t scale.
One offline batch transcription option for macOS
If you’re looking for an offline solution that supports real batch workflows, PrivateWhisper is designed with this use case in mind.
It supports:
selecting multiple files or folders
offline transcription using local models
long recordings
exporting results in multiple formats
You can test it for free and decide later if batch features fit your workflow.
Transcribing audio on a Mac usually means uploading files to a cloud service. That works — until you’re offline, dealing with sensitive recordings, or simply don’t want your audio leaving your device.
The good news: modern Macs can transcribe audio entirely offline, with no internet connection and no cloud services involved.
This guide explains how offline transcription works on macOS and how to do it properly.
Why you might want offline transcription on Mac
There are several practical reasons to avoid cloud-based transcription:
No internet access (travel, flights, unreliable connections)
Confidential recordings (interviews, meetings, legal or medical audio)
Large files that take too long to upload
Long-term cost of subscription-based cloud services
Privacy concerns and data retention policies
Offline transcription solves all of these by processing audio locally on your Mac.
What “offline transcription” actually means
True offline transcription means:
Audio files are processed entirely on-device
No uploads to external servers
No API keys or background network calls
Transcription works in airplane mode
Some apps claim to be offline but still rely on cloud services for parts of the process. A real offline solution does not.
What you need to transcribe audio offline on macOS
To transcribe audio locally, you need three things:
A Mac with enough processing power Apple Silicon Macs (M1, M2, M3) are ideal, but Intel Macs can also work.
A local speech-to-text model Modern models can run fully on-device and offer high accuracy without internet access.
A macOS app that supports offline processing The app must handle model loading, audio decoding, and transcription locally.
Once these are in place, transcription works anywhere — even without Wi-Fi.
Step-by-step: transcribing audio on Mac without internet
1. Prepare your audio file
Offline transcription works best with:
clear speech
minimal background noise
common formats like WAV, MP3, or M4A
No internet is required at this stage.
2. Use an offline transcription app
Choose an app that:
runs transcription fully locally
supports long recordings
does not require account login
works without an internet connection
Once the app and models are installed, you can disconnect from the internet entirely.
3. Select the right model
Larger models:
are slower
use more CPU/RAM
provide higher accuracy
Smaller models:
are faster
use fewer resources
are suitable for drafts or clear audio
Offline apps usually let you choose based on your needs.
4. Transcribe and export
After transcription, you should be able to export results as:
plain text (TXT)
subtitles (SRT, VTT)
structured formats (CSV, JSON)
All without uploading anything.
Is offline transcription accurate?
Yes. Modern on-device speech-to-text models are highly accurate, especially on Apple Silicon Macs.
In practice, accuracy depends more on:
microphone quality
speaker clarity
background noise
than on whether transcription happens locally or in the cloud.
For most use cases, offline transcription is more than sufficient.
Common offline transcription use cases
Offline transcription on macOS is especially useful for:
interviews
meetings
lectures
podcasts
voice notes
research recordings
Anywhere privacy or reliability matters, offline is the safer choice.
One practical offline solution for macOS
If you want a simple way to transcribe audio on Mac without internet access, PrivateWhisper is an offline macOS app designed for exactly this use case.
It runs transcription fully on-device and supports:
long recordings
batch transcription
multiple export formats
You can try it for free and decide later if you need advanced features.
Taking notes during fast lectures can be stressful. Slides change quickly, the teacher talks faster than you can type, and you often end up with half-finished sentences instead of usable notes.
A better approach is simple: record the lecture and transcribe it later. The problem? Most transcription tools are cloud-based and require uploading your audio — which isn’t ideal for privacy, especially when recordings include classmates, teachers, or sensitive topics.
In this guide, you’ll see how to use Whisper to transcribe lectures completely offline on macOS, so your audio never leaves your Mac.
Why Students Should Use Offline Transcription
For students, offline transcription solves a couple of real problems:
Privacy – recordings of teachers and classmates stay on your device
No upload limits – long lectures won’t hit some random “free tier” wall
Works on campus Wi-Fi or offline – you don’t depend on a stable connection
Flexible workflow – you can record on your phone and transcribe later on your Mac
If you’re studying medicine, law, or anything where lectures contain sensitive content, uploading everything to random servers is simply not great.
What Is Whisper and Why It’s Good for Lectures
Whisper is an open-source speech-to-text model by OpenAI. It’s very good at:
understanding different accents
dealing with noisy classrooms
handling long audio (full 60–90 minute lectures)
working well even when audio isn’t perfect
The downside: the raw Whisper CLI is technical. You need Python or C++, ffmpeg, models, and command-line skills. That’s fine for some people, but not for most students.
The good news: you can use Whisper through a simple Mac app and skip all the setup.
Best Way for Students: Use an Offline Mac App (No Terminal)
If you don’t care about coding and just want lecture transcripts, the easiest option is a GUI app that bundles Whisper and runs fully offline.
PrivateWhisper (Offline Whisper app for macOS)
PrivateWhisper is a small macOS app that:
runs Whisper directly on your Mac (no cloud)
supports the same models (Small, Medium, Large V3)
How to Transcribe Lectures Offline on Mac (Step-by-Step)
Step 1 — Record the lecture
You can:
use your iPhone (Voice Memos or any recording app)
use your Mac directly (QuickTime, or any audio recorder)
make sure the microphone is reasonably close to the lecturer
Simple tips:
sit somewhere near the front
don’t cover the microphone with your hand or bag
if possible, record in mono (smaller files, fine for Whisper)
After the class, transfer the file to your Mac (AirDrop, iCloud Drive, USB, whatever you like).
Step 2 — Open the file in PrivateWhisper
Launch PrivateWhisper on your Mac
Drag & drop your audio file into the app
Choose the language (or let it auto-detect)
Supported formats typically include:
M4A (iPhone recordings)
WAV
MP3
MP4 / MOV (if you recorded video)
You don’t have to convert anything manually — the app handles it using ffmpeg internally.
Step 3 — Choose the right Whisper model
For lectures, you usually want a balance of speed and accuracy:
Small / Medium – good enough for most lectures, faster
Large V3 – best accuracy, especially if the audio isn’t great or the topic is technical
On Apple Silicon (M1/M2/M3/M4), Medium or Large V3 work quite well even for longer recordings.
If you’re on an older Intel Mac, start with Small or Medium so it doesn’t take forever.
Step 4 — Transcribe and wait
Click Transcribe.
While it runs:
you can keep using your Mac for light tasks
close heavy apps (Chrome with 40 tabs, big games) for best speed
a full 60-minute lecture usually finishes in a reasonable time on Apple Silicon
Step 5 — Export your transcript
Once transcription is done, export the text:
TXT – for simple notes
Markdown – if you use Obsidian or a note-taking app
SRT/VTT – if you want subtitles for a recorded video lecture
From there, you can:
highlight important parts
add your own comments
turn it into condensed study notes
How Accurate Is Whisper for Lectures?
Accuracy depends on:
audio quality
how clearly the lecturer speaks
background noise
chosen model size
In practice:
for clear lectures with a decent recording, Medium or Large V3 can get very close to perfect
for noisy rooms or fast speech, you may need to manually fix some words — but it’s still way faster than writing everything by hand
For exam prep and revision, even slightly imperfect transcripts are usually more than enough.
Whisper vs. Cloud Services for Students
Feature
Offline (Whisper / PrivateWhisper)
Cloud transcription
Privacy
🔒 Everything stays on your Mac
❗ Audio uploaded to remote servers
Cost
Free after setup
Often pay per minute/hour
Internet needed
No
Yes
Good for long lectures
✔️
Sometimes limited by pricing
Control
Full (local files, local text)
Locked into platform
If you’re dealing with sensitive content or just don’t like the idea of uploading your classes, offline is the safer choice.
Tips for Students Using Offline Transcription
Always ask if recording is allowed – some teachers or schools have rules
Charge your phone / Mac before long lectures
Do a 1–2 minute test recording once, so you know that your setup works
Don’t rely only on transcripts – it’s still good to mark key moments during the lecture (time stamps or quick notes)
After transcription, clean up and highlight main concepts — that’s where you actually learn
Conclusion
Using Whisper on macOS is a practical way for students to turn lectures into searchable text — without sending any audio to the cloud. You get better notes, less stress in class, and more control over your data.
If you want a simple offline solution that doesn’t require terminal commands: